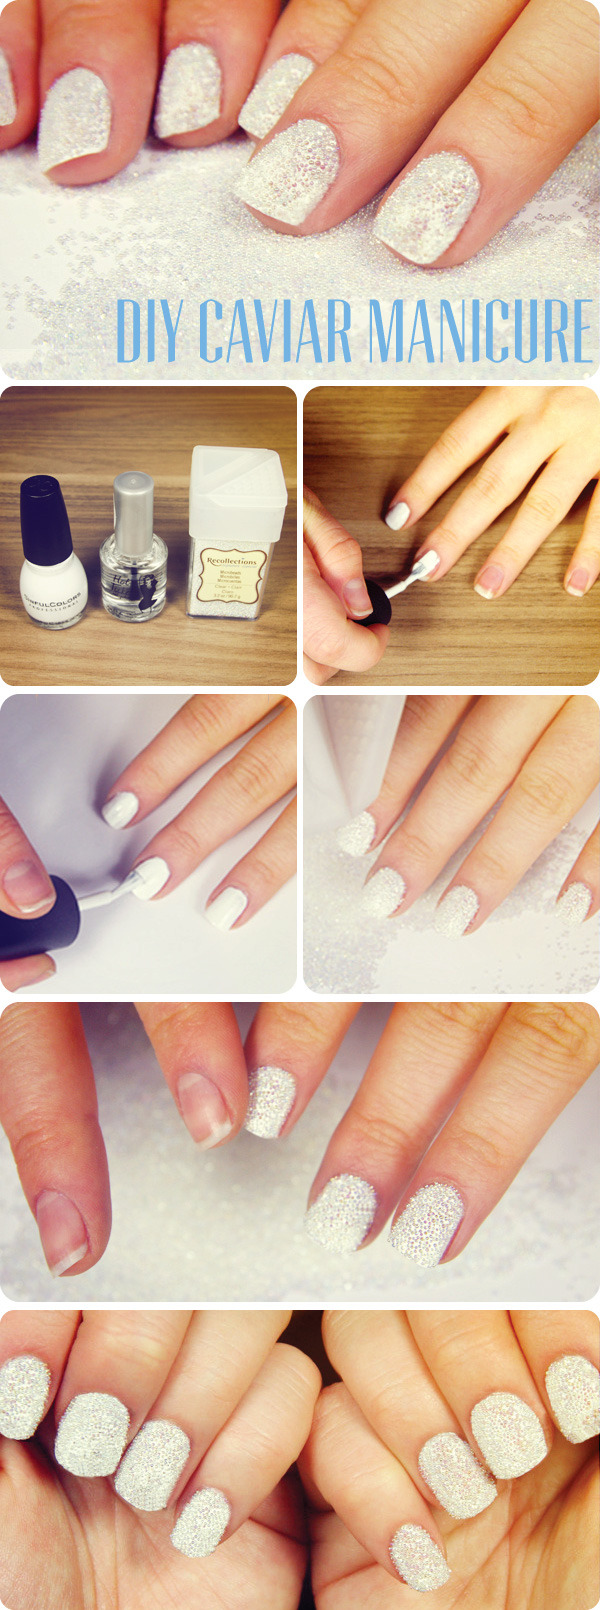
Tuesday, August 27, 2013

DIY Caviar Manicure

DIY Caviar Manicure


YOU'LL NEED:
  • Base coat
  • Opaque nail polish (no shimmer)
  • Clear micro beads (available at most craft stores—we snagged our jar for three dollars!)
  • Top coat

STEP 1

THE BASICS
First, apply a clear base coat on completely bare nails. Next, apply one coat of no-shimmer white polish (a thinner formula is best) onto your nails and let them dry. We chose white, but you can use any color with the clear beads.

STEP 2

COAT AND CAVIAR
Apply a generous second coat of color to one hand, and let the polish get tacky for 10 seconds. Then, over a sheet of paper, a cup, or a plastic tray, pour the microbeads over your nail bed, ensuring you coat the entire surface of your nail bed like glitter over glue.

STEP 3

IM-PRESSED
When each nail is entirely covered, use the pad of your finger to press and secure the caviar beads. Repeat this on your other hand.

STEP 4

THE LEFTOVERS
Pour the excess beads back into the jar to save for later, then apply a tiny drop of top coat along your nail tip to seal the caviar. The look should last two or three days before the beads start to fall. Black-tie nails at a bargain price—you can’t beat it!


Source : Beautylish

Galaxy Nails


The galaxy nail trend is taking off right now, so why not join the fun? Creating this detailed glitter manicure may seem like it could take light years, but with a few colors and a little sparkle, you can have a vibrant nebula on your fingertips too!
WHAT YOU'LL NEED
  1. Base Coat
  2. Dark nail polish for base color
  3. Light color for base of nebula
  4. Two to three bright nail polish colors to create nebulae
  5. Cosmetic sponge
  6. Piece of paper
  7. Glitter polish
  8. Top coat

Step 1

APPLY BACKGROUND COLOR AND FIRST NEBULA'S HIGHLIGHT
Using a dark shade, preferably a deep blue or black, apply one or two coats of nail polish on top of your base coat to serve as the base color of your space design. Then sponge on your first layer of light color (we used a pale green) in thin layers and allow to dry. This serves as a starting highlight in the background of your nebula.

Step 2

CREATE THE NEBULAE
Use a sponge to lightly dab a thin layer of a bright color (we chose pink) onto the base of your nebula. If you get too much polish on the sponge, just dab it off on the paper. Wait one to two minutes between each application so that the colors can dry. When you put another coat on top of a color, the lacquers re-activate and are easier to blend because the layers are wet again. Repeat process with as many colors as you want.

Step 3

ADD GLITTER AND TOP COAT
Add stars by applying one or two coats of a glitter polish on top of your design. We suggest using a nail polish that contains different size glitter to give the illusion of dimension and distance. To make sure your new space-age manicure will last, apply a top coat and you’re ready to blast off!


Source : Beautylish

Monday, August 26, 2013

What is Nail Art?

Nail art


Nail art is a creative activity that draws pictures or designs fingernails. It a type of art. These days fingernails and toenails are seen by some as important points of beauty.
Also, it is a type of fashion activity, related to manicuring. There are commercial shops ('nail bars') where nails are worked on to make them attractive. The main product is acrylic nails with ready-made designs which can be stuck on top of natural nails.


Nail polish

Nail polish, or nail varnish, is a lacquer applied to human fingernails or toenails to decorate and/or protect the nail. Today’s nail polishes are usually nitrocellulose in a solvent such as butyl acetate or ethyl acetate. They may be clear or coloured with pigments. The coating has a plasticizers (e.g. camphor). This links polymer chains, spacing them to make the film flexible after drying. That way it resists cracking or flaking caused by the natural movement of the nail.

History

Nail polish was used in the ancient world. In China it started off being made from a combination of beeswax, egg whites, gelatin, vegetable dyes, and gum arabic. The Chinese would dip their hands in an oil for several hours their finger nails would turn red or pink. In Ancient Egypt henna was used. The henna stained their fingernails orange, which turned dark red or brown after the stain matured. In 1300 BC, the colour of the nail polish reflected social rank. The colours gold and silver were favoured; later, black and red were the favoured colours. Red is the colour Cleopatra wore.
By the turn of the 9th century, nails were tinted with scented red oils, and polished or buffed with a chamois cloth, rather than simply polished. In the 19th and early 20th centuries, people pursued a polished rather than painted look by massaging tinted powders and creams into their nails, then buffing them shiny. After the creation of automobile paint, Cutex produced the first modern nail polish in 1917. Synthetic nail polish was introduced in the 1920s in Paris.


Source : Wikipedia and Google